Almost every person wishes to have their own portrait at home, which is considered one of the most difficult drawings that an artist can draw. Not surprisingly, there is a great demand for this particular type of pattern. Therefore, the duty of a novice and experienced artist is to step by step improve their skills in drawing human facial features, because through the face you can convey not only gender and age, but also the character and temperament of a person. According to their characteristics, portraits are divided into three types: children's, women's and men's. Today we will learn how to draw the last view - male portrait with a simple pencil
. It has its own features and secrets, which we will discuss in this step-by-step lesson.
Tools and materials:
- White sheet of paper.
- Simple pencil.
- Eraser.
Stages of work:
Photo 1. With a simple pencil, outline the height and width of the man's face. Each person has a different size, but the average height is one and a half times the width. This is what you need to focus on:

Photo 2. We draw a portrait in full face, so the task is a little easier. right and left side make it symmetrical. Let's draw a rounded frontal part, and on top we outline the cheekbones and chin:

Photo 3. On the upper part of the face, draw an oblique line along which we will later place the hair. On the sides we retreat a small distance and fix it (for the ears). Above the forehead, draw a curved line to determine the height of the hair:

Photo 4. Draw a center line across the entire face. It is no secret that it helps in building facial features to make them more even. To find the location of the eyes, you need to divide the entire height of the head in half, which we did by drawing a horizontal line. Now let's add the height of the nose. It is located just above the middle of the lines of the eyes and chin:

Photo 5. Next, draw the width of the mouth. From the extreme corners of the nose we will draw lines expanding to the bottom. And from the chin we draw parallel lines. These four lines intersect approximately halfway between the nose and chin:

Photo 6. Let's draw the nose, defining its width. Adding ears. They will mutely cover the top with hair:

Photo 7. Our man will have wide eyebrows. For now, outline their width with a line. We are not in a hurry to work out their details. Let's draw the shape of the hair and the lower part of the face, softening the lines:

Photo 8. Now we can add the eyes. Here it is important not to darken, so we make the lines light. Shade the eyebrows and draw the nose:

Photo 9. Let's move on to the lips. We make them of medium size with pointed edges. We make the chin rounded:

Photo 10. At this stage, we outline the location of the bristles near the nose:

Photo 11. We select with a simple pencil the main features of the face: contour, eyes, nose:

Photo 12. We start shading the face. First you need to draw the edges of the face:

Photo 13. Now let's lay strokes on both sides of the nose, the upper lip and the inside of the eyes:

Photo 14. Thanks to more pressure on the pencil, select the eyes and eyebrows:

Photo 15. Let's draw a shadow on the cheekbones, beard and hair:

Photo 16. We continue to increase the saturation of the shadows and work out the details:

Photo 17. Let's draw from below simple lines neck, shoulders and clothes guy. We enhance the contrast of the face, highlighting the cheekbones, mouth and eyes:

After reading this article, you can try yourself as an artist and draw a portrait of your mother, father or any other person.
Sometimes you just don't know what to do when you're at home. You start to draw little by little flowers with a pencil, but you want to draw something more serious, for example, a portrait. But how to do that? How to learn to draw correctly?
Many artists of various eras, each time practicing the art of drawing, were able to achieve incredible skill. Our task is to study the main principles of drawing in order to learn how to draw a portrait of a person with a pencil and paints. Of course, it cannot be said that it is very difficult. But if you do not know the basics, then you will not be able to draw a beautiful portrait.
To begin with, you should find out what kind of portraits of a person exist. Each of us considers a portrait to be an image of a person's face. But is it really so? In nature, there are various types of portraits:
- Shoulder portrait. Only the head is shown here.
- Bust portrait. In this case, a person is drawn up to the chest.
- Half-length portrait. It shows an image of a man from head to waist.
- Generation portrait. In such a portrait human body depicted from head to knees.
- portrait in full height.
Also, portraits can be divided into the following categories:
- Profile portrait.
- Full face portrait.
- Half-turn portrait.


In the implementation of each of these types, you need to take into account some of the nuances. But, and most importantly, you need to study the human anatomy carefully. Otherwise, you will not be able to correctly depict the proportions of the human body.
If you are a beginner artist, then you first need to try to portray a portrait of a woman or a man from the side. After you master this technique, you can proceed to more complex ones, for example, draw a face from the front.
How to draw a portrait of a person with a pencil: a detailed explanation for children and beginners?
You may be surprised, but many famous artists argue that it is more difficult to paint not a portrait, but nature. Therefore, if you want to try to draw a portrait of a person, feel free to get to work.
To make a beautiful portrait, you need:
- Choose the right model for you. Yes, you must definitely like the object you have chosen.
- Master basic geometry skills. This is required in order to correctly calculate the places where they should be located: mouth, nose, eyes.
Draw a portrait of a man:
In the face of a man, the lines are not quite smooth, but more straight. However, this does not mean that they are drawn easier. Accordingly, try not to spare the paper, draw the front contour until it acquires the necessary shape. Now start drawing and follow the following instructions:
- Make an oval to get the outline of the face.
- Now draw a clear horizontal line in the center.
- Step back a little from this line down, draw a second one that will be parallel to it.
- Draw a perpendicular line from the center of the second line. Mark on it the location of the mouth and the tip of the nose.
- Step back a little along the oval, draw an ear.

 Beginning of drawing
 - In the central part of the lower half, draw the pupils and finish the eyelids.
- Add the outline of the hair.
- Draw eyebrows, make a beautiful hairstyle.
- Get to the lips. To start with a smooth line, indicate the lower lip. After that, in a mirror form - the upper lip so that it has a recess in the center.

- Draw the nose. Show the tip of the nose with a slightly expanded "tick". Draw a pair of arched lines from it.
- From the arch of the eyebrows on the right, draw a curved ruler so that it deviates to the right.
- Add details to the contours of the eyelids and eyebrows.
- Draw the hair.
- Draw the missing elements of the ears.

- Erase the guide lines.
- Get to the shadows. Make small blackouts in the area of the cheekbones, forehead, nose, blend them.
- Slightly shade under the eyes and in the neck area.


With the help of this instruction, you will understand how, without much difficulty, you can draw a male face in stages with a pencil.
Let's depict a female portrait:
In the portrait of a lady, give up hard angular lines. In return, they will receive smoothness and femininity:
- Draw an oval for the face.
- Draw a couple of lines. They should intersect and be in the center of the face, deviating slightly to the right.


- On the resulting lines, mark the main elements: lips, eyes and nose. Draw each curve in detail.
- Draw a ruler down from the cheekbone, shape the chin.
- Make the folds of the eyelids, eyes and nose.
- Draw the lips.


- Now you can proceed to the cilia and pupils. Don't forget to show highlights at the bottom.
- Draw the ears.


- Start applying shadows. Take a soft pencil, blend the shadows around the eyes, around the cheekbones, neck and nose.
- Draw an approximate hairstyle.


- Remove all additional rulers, start shading the portrait.

- Make your hair voluminous by shading at the roots.
- Shade the background more intensely so that it is darker.


Learning to draw eyes:
As we all know, the eyes are considered the mirror of the soul. Therefore, it is the eyes that you should pay special attention to.
- Make two ovals for the eyes.
- Draw the pupils and irises of the eyes.
- Be sure to finish the eyebrows, otherwise you will not get the eyes you need.
- Draw eyelashes. They should look up or down from the arc. In the central part of the eyes, draw the cilia a little shorter.
- Detail them: inside the corner, draw short eyelashes, and along the edges - thick and long.
- Shade the third part of the irises of the eyes so that there are light spots on the pupils and the edges are dark.
- Add shadows on the lower eyelids and along the edges of the corners of the upper eyelids.


You and I found out that in order to depict a portrait, you need to adore geometry and know what proportions are. Now let's look at some anatomical features that will come in handy for drawing a face.
- The horizontal ruler in the center of the eyes should be equal to the distance between the right and left eye.
- The same ruler between the lips should be equal to the distance between the right and left pupils.
- The distance that is between the mouth and the eyebrow is equal to the length of the ear.
If you want to see all the errors in the resulting portrait, bring the portrait to the mirror. Believe me, all the flaws in the image will become more noticeable.
Video: How to draw a man's face with a pencil?
Video: How to draw a woman's face with a pencil?
How beautiful it is to create a portrait of a girl and mother with a pencil in stages?
Prepare all materials for drawing. On the right paper, soft pencils erase well and do not leave marks behind. Avoid hard pencils as they leave marks on paper. Now you can start drawing a portrait, but already at the professional level.
- We fix the paper. Fasten the paper sheet with the help of buttons to a special tablet (plywood sheet attached to a wooden frame). Attach the tablet to the stretcher so that the angle is 45 degrees.
- We work out all the details. Mark all the lines that were indicated in the first version of the portrait image. Here, pay special attention to what shape the parts of the face will have.
- Consider every little thing, work out all the details. Since your portrait must turn out to be similar to a human face.

- We draw the eyes. There are three rulers along which the eyes are drawn. The center line is where the pupils of the eye are drawn. Draw your own eyes and eyeballs. As long as you have to draw only outlines of the contours, strokes are not needed. Eyebrows should be drawn on top of the eyes. Once you are done with the pupils, carefully draw the eyelids, and mark the wrinkles. Draw eyebrow lines above the eyes.
- We draw lips. The lips also have three lines. First, draw the lower lip, as it is much easier to draw. After that draw the upper lip. Divide it into two equal parts using a hollow. Make lips bulging with the help of shadows. Mark the folds if the person has a smile on his face.
- We draw the nose. Mark the tip of the nose above the lips. Mark it with a tick, that is, in the form of a soaring bird. On one and the other side of this "tick" draw a couple of small arcs. Now apply shadow on the nose.


So, you have outlined and drawn the main details of the portrait. You have done a great job, namely:
- You were able to determine the locations for the eyes, nose, lips and ears.
- You sketched them on paper.
- You have drawn every detail and every element.
- You put shadows on your nose.
The final stage of drawing a female portrait
The next step is to put shadows on the portrait of a person. This stage is considered very important, since it is he who makes the face come to life. Pay special attention to the eyes. A look that does not have a touch of life in itself will simply ruin your work, respectively, work out the eyes with special care and thoroughness. Draw the eyeballs, draw the pupils inside. Don't make them dark. Glare must be present on each pupil of the right and left eyes.
The last stage in the portrait of a person is to draw an oval of the face and shadows. Also draw the hair. You probably remember that at the first stage you outlined the ears? If your portrait will have a cropped hairstyle, then thoroughly work out each ear. If the hair is long, then you can cover your ears with a hairstyle.

Apply shadows
Now you will fully come to the aid of a soft pencil. Here's the thing: a pencil that has a medium hardness, or a hard pencil, can't apply shadows perfectly. Many artists have one technique - they make invisible strokes of pencils. Everything happens as follows: they smear strokes on paper with the help of a fingertip or a piece of paper. Now you can draw a correct portrait of a girl and mother with all the nuances and subtleties.
How beautiful to create a portrait of a girl and mother with paints?
Do you want to paint a portrait of a girl or mother with paints, but are you afraid that the drawing will not work? Cast aside your own fears and read our recommendations. For drawing, you need to stock up on the following materials:
- A set of watercolors.
- Soft brushes of various sizes (squirrel hair or kolinsky).
- Watercolor paper.
- A tablet made of wood (we described it a little higher).
- Hard pencil and eraser.
- The paper on which you will sketch.
To get started, make a few sketches of the future portrait, and also decide how exactly the person’s face will be depicted in the drawing.
Step-by-step instructions for drawing a portrait with paints:
So, you have finished the preparatory process, now you can create a picture. Break the whole process into the following sequential steps:
- Draw a portrait with a pencil. This step is considered very important. Make each line visible, do not use the eraser often. Since this will cause your paper to be worn out, and, accordingly, the colors will lie unevenly. You can draw a portrait in advance on a separate paper, and then transfer the drawing to a special watercolor paper.

- Now start drawing. To begin with, apply a transparent, very light underpainting to the paper using paints. Use pale orange face paint. Paint over the entire face with broad strokes. Where there will be highlights, leave the paper untouched. After that, pick up other shades of paint, and go through the hair and clothes with a brush. Leave the lightest areas untouched.

- Take care of the eyes and lips. Choose the paint you need. It must be diluted with water to get a pale shade. Paint over the iris with the resulting paint. Draw the lips in the same way.

- Apply shadow all over your face. You can apply a warm reflection of light to one side of the face. Display cold reflections from things on the chin. Learn this when drawing a portrait, depict them in the drawing with additional tones.

- Next, take a closer look at each shadow. Find the darkest areas of the cheekbones, lips, sides and wings of the nose, near the hair, and so on. It is thanks to the shadows that you can model the face and give it a natural volume. There is main principle- move constantly from the lightest shades to the darkest.
- Find light intermediate shades of shadows and light: in the area of \u200b\u200bthe face where the ray of light falls, there are also dark and light places. Watch how the light "plays" and repeat this while drawing on paper.
- With a hairstyle and things, carry out the same actions as when working with a face.
- Final step: take the thinnest brush, select the smallest elements and lines with it. Draw each strand of hair, eyelashes, lips. Remember - while working with paints, even in very dark areas, the paint must be transparent.


- Paint the background while drawing the portrait, but you can also postpone this process until the last moment. Most importantly, do not work on the background more than the portrait, but avoid carelessness as well.


We hope you were able to learn in general terms how to draw a portrait of a girl using paints. Portrait for scribbling  Portrait of a man
Video: How to draw a girl's face with paints in stages?
drawing a portrait For a novice artist, it seems an incredibly difficult undertaking. Often beginners rush to create a portrait without learning its basic principles and techniques. Each face drawing ends in disappointment, which can lead to an absolute loss of interest. You should not give up, because every portrait painter started by learning the basic rules, practiced them, made dozens of mistakes and eventually achieved positive results. Now we will analyze drawing a portrait with a pencil, its features and rules. They will help to achieve the correctness, and most importantly, the realism and high quality of the portrait.
There are three main positions in which a face can be placed in a portrait.
1. Full face- the direct position of the head, in which the entire face and its features are fully visible. The head is not tilted, so the ears are not fully visible.
2. Profile- the lateral position of the head, in which only half of the face is visible. This is the left or right part, on which the eye, ear, half of the nose and mouth are located.
3. three quarters- this is the position between full face and profile. Usually one of the sides of the face is completely visible, and on the other side only parts of the face are slightly visible.
Features of the position in profile and full face, their standard parameters
Full face:
- The pupils are located strictly in the middle of the face. If you divide the face horizontally into two parts, you can see that the eyes will be at the level of the line, or rather, the pupils.
- The tip of the nose is in the middle of the face, between the eyebrows and the chin.
- The line of the mouth is located between the tip of the nose and the chin.
- The height from the hairline to the edge of the top of the head is equal to the height from the pupils to the tip of the nose.
- The width of the face is measured by the width of five eyes horizontally. Height from chin to lower lip - with one eye (vertically deployed).
- The upper part of the ear is at eye level, and the lower part is at the tip of the nose.

Profile:
- The ear is in the midline, which divides the head in half.
- The base of the nose is located in the middle of the face.

Let's talk about the parts of the face. Each person has their own individual shape and size, but the construction is similar for everyone. We will analyze what structure certain parts have and how to do it correctly.
Eye:
- Its corners have different heights. Usually the outer part is higher than the inner.
- The iris is not fully visible when a person looks straight ahead. Fully visible only when a person looks down.
- The lashes on top are longer than the ones on the bottom.
- Always draw the iris and pupil. The eye looks quite artificial and cartoonish when one of these parts is not there.

Nose:
- In full face, the tip and wings of the nose are clearly visible, and the trunk is only depicted with the help of shadows.
- If you depict the nose in profile, then only the outline of one side and the nostril are visible.
- A difficult angle is considered to be three-quarters. Here you need to be careful so that the nose is natural. This view combines "full face" and "profile", so it is important to evenly highlight the contour, wings and tip.

Lips:
- The mouth line, which is in the middle, will have a clearer appearance than the lip lines.
- Draw the lips starting with the top lip because the bottom lip has a more simplified look. It will not be difficult to outline it at the end.
- The upper lip is usually thinner than the lower.
- The midline of the mouth will drop slightly towards the edge. Even if a person is depicted with a smile, all the same, at first the corners fall slightly, and then rise again.

As you know, the image of people is one of the most difficult areas in art. In order to beautifully draw the figure of a man, woman or child, a novice artist needs to have not only certain professional skills, but also knowledge of anatomy, as well as be able to observe proportions. A portrait created with a simple pencil is one of the most romantic gifts you can make with your own hands. Surely each of us, at least in our dreams, thought about how to draw a portrait from a photograph. Do not be ashamed of your inexperience, try to draw with a pencil, because even those portrait painters who are taking their first steps in creativity can do it.
Beginning of work
Before you start drawing a portrait, you should study the photograph, what position the head of the depicted person occupies, how it is rotated relative to the vertical and horizontal. Be sure to pay due attention to the proportions (size, as well as the relative position) of the eyes, nose, ears and mouth. Accurate observance of proportions when applying the first strokes is an important guarantee of the similarity of the final image with the face in the photograph. Familiarize yourself with the average proportions of a human face shown in the figure, and then compare them with the original image in the photograph. If they diverge a little, there is nothing to worry about, since it is precisely in deviations from the standard that the individuality of a living person captured with a camera lies.
For more detailed information about the structural features of the human skull, which may be needed when depicting a portrait, you can always refer to the anatomical atlas. Apply with light lines the general outline of the oval of the face, hair, lips, nose, eyes and eyebrows.

After that, you can begin to analyze the planes of the face. At this stage, the height of the nose should be marked with a plane. In order to better see the volume, it can be shaded. This should be done with all areas of the future portrait that are in the shade. Next, we denote the plane of the lips, the cheekbone, located closer to us, as well as the plane of the eyes, which connects to the eyebrows. At this stage of creating a portrait, it is quite easy to outline the geometric features inherent in the face of the depicted person, without even drawing it with smooth lines.

Performing face detailing
Peel off the top layer of the pencil using a nag eraser to make the previously drawn lines almost invisible. After that, we proceed to drawing all the features of the face. We round them in order to give the portrait the maximum resemblance to the photograph.

It is no secret that the eyes are often called the mirror of the human soul - they are very expressive. Therefore, there is no need to prove the importance of accurately conveying their location and shape. In order for the eyes drawn on paper to look more alive, the sclera (the so-called white part of the eye) does not need to be depicted as snow-white, since in fact its color changes under the influence of its own shadow and the shadow that the eyelid casts on it. Apply highlights to the lower eyelid and inner corner of the eye.

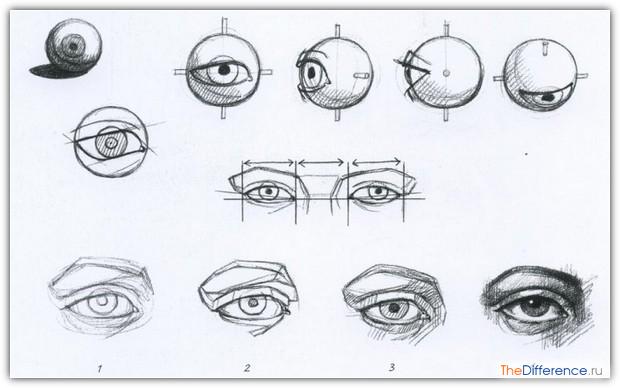
The figure below shows the sphericity of the eye, as well as how the eyelids rest on the eyes. Here, a novice artist can also get acquainted with the sequence of depicting eyes in a portrait, starting with highlighting and shading areas (2 and 3) and ending with highlights and shadows. It should be noted that women and men of different age categories have different eyes. For example, women tend to have longer, thicker eyelashes and thinner and more defined eyebrows than men.
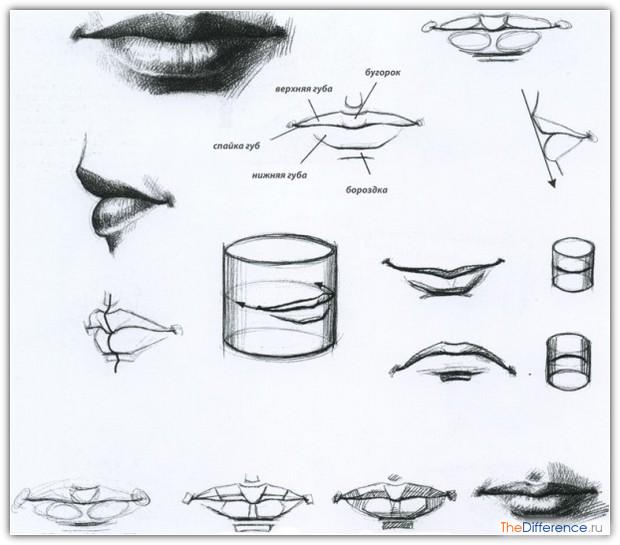
The mouth in its expressiveness is not too inferior to the eyes. It is the lips that are the place of transition of the mucous membrane to the skin. This is the reason for their characteristic pink color. When depicting lips in a portrait, it should be remembered that they are the most mobile element on the face, capable of taking one form or another. The upper lip is usually thinner than the lower lip.
Many, when drawing a portrait from a photograph, are faced with the problem of depicting a nose that looks completely different from different points of view. The main task is to be able to convey the main contrast of shadow and light on the nose, so that the drawing does not turn out to be overloaded with unnecessary elements. Usually, but not in all cases, the maximum light falls on the tip of the nose and the bridge of the nose, and the thickest shadow falls on the base of the nostrils (figure).

As for the ears, their shape varies greatly among different people, but does not have pronounced features in the representatives of the stronger and fairer sex. Despite the fact that in photographs the ears are often hidden by hair, professional artists recommend not to neglect them, in particular their most expressive and precise position on the sides of the head. The length of the ear in adults is approximately equal to the length of the nose (see figure). In children, the ears are proportionately slightly larger.

Hatching, working out halftones as important stages in drawing a portrait
Upon completion of work on the detailing of the face, we proceed to the beginning of hatching. First, you should erase all the extra lines that are on the portrait, since after the start of laying the tone, there will no longer be an opportunity to do this with sufficient accuracy. There are no specific hatching rules - everyone does what is more convenient for him. Professional artists advise starting hatching from the darkest parts of the portrait. In the future, it will be possible to build on them, so as not to darken clothes, eyes, skin too much.

When giving a tone to the skin of the face, clothes and hair, you should not use a nag (unless, of course, you accidentally put a stain on the future portrait). If you are right-handed, then intensive shading of halftones should begin from the upper left corner of the sheet, in order to avoid smearing what has already been depicted. Accordingly, the left-hander needs to do everything mirrored. At this stage, a slight study of the background is allowed.
Highlighting and darkening - the last stages of working on a portrait from a photograph
At the end of the hatching, if you did everything right, you will get an almost finished portrait, which, however, will not look voluminous. To correct this flaw, it is necessary to highlight some places on the face, such as the tip of the nose, the brow ridges, the upper part of the cheekbones, the sclera of the eyes, the lower lip and sometimes the chin. Using the nags, the artist can draw the small folds that are present on the lips and wrinkles, as a result of which the portrait will become more alive. Lightening of hair should be performed in places of the largest fractures of the forms. In this case, they will appear shiny and more realistic.

After illumination, proceed to final stage- darkening those areas where you need to demonstrate the space. Such places can be the ears, the edge of the hair, the background, the folds that are on the hair. After that, the portrait will be almost ready. However, in any case, you will have unnecessary strokes, stains from fingers stained with a pencil. Therefore, you should take the nag in your hands for the last time and eliminate everything that visually seems superfluous to you.

After reading this article, you should not take it as a ready-made guide to how to draw a portrait of a person from a photograph. Indeed, even with the maximum similarity of the resulting portrait with a photograph, we always have a place for creativity. You are not at all obliged, when redrawing, to copy exactly everything that you do not want to see in the portrait. Before you is a blank slate, ready for the realization of all ideas. As you know, photography is not always successful in all criteria. Well, the artist, working on a portrait, can think up, correct and get as a result what turned out to be beyond the power, due to the specifics of the creative process, to the photographer.
If you have ever picked up a simple pencil and drew people, then most likely you know how difficult it is to create a portrait of a person. Indeed, in addition to the general outlines, it is necessary to use three-dimensional graphics, the play of light and shadow. This must be done in order for the flat image to come to life and look the most realistic. However, not everyone knows about the use of such a technique. Therefore, we decided in our article to talk about how to draw portraits of people correctly.
What is a portrait of a person?
Before you start drawing, you need to find out what a portrait is. Basically, this is an image of the head (from the top of the head to the shoulders). A little less often, portraits depict people in full growth. The purpose of such a drawing is to convey as accurately as possible the image that the artist sees in the image of the model. Portraits can be drawn with simple paints, crayons, charcoal.
Every artist knows a person, regardless of the technique used and the tools at hand. In this case, the master performs a drawing using light and shadow. But in order to get a more or less realistic and close to the original portrait, you need to practice. As practice shows, you need to make at least 50-100 drawings.
This is necessary in order to fill your hand and develop your own technique on the canvas.

What are portraits of people?
Before you draw portraits of people, you need to find out what they are. In this case, it all depends on the gender and age of the model with which the portrait is made. For example, images can be female and male, children's. At the same time, they differ from each other. In particular, the male pattern differs from the female one in the coarser presence of a massive chin, in men it is sharper and wider.
In addition to this, for male portraits characterized by the presence of protruding parts of the face: cheekbones and superciliary arches. Women's drawings contain more rounded shapes and smoothed corners in the forehead and chin.

We prepare all the supplies for drawing
At the first stage, it is recommended to prepare a sheet of paper, a few simple pencils with different levels of softness, and an eraser. Experienced artists also use a number of additional tools, such as an electric eraser, which works more gently and does not leave such streaks as a regular eraser. Before you draw portraits of people and make them realistic, you need to carefully follow our instructions step by step.
And, of course, take care of the model or find from which you will draw a portrait.
Choose a simple pattern
If you are just starting to take your first steps in fine arts, then you should look for photos or pictures that show not too complex portraits of people. For beginners, drawing pictures made in a difficult technique is undesirable. It is better to choose a photo simpler. As an example, we will explain how to draw a female image.

Define the top and bottom of the image
In the next step, take a sheet of paper, carefully examine your model, study all the details and start drawing. Determine the top of the future sketch and the bottom. Make visual measurements of the face parameters of the image. This must be done so that you get the most accurate picture. Yes, and so that everything fits on your worksheet: hair, forehead, chin, neck and, possibly, shoulders.
Next, we draw a portrait of a person in stages as follows: divide your sheet of paper exactly in half horizontally; repeat the same vertically; you should end up with four identical squares. In this case, you should not press too hard on the pencil, since all these lines are auxiliary, and will subsequently be erased.
Delimitation of a plane on a sheet
Take a pencil and go to one of the nearest top squares. Split it in half. Do the same with both squares in the lower plane. Then divide the bottom squares in half again.

We outline the oval of the face
Next, we draw a portrait of a person in stages, starting with a sketch. To do this, go to horizontal line delimitation on the sheet, and then, departing from the beginning of the page a few centimeters, draw lines of the face. Pull them all the way to the bottom and round off at the end. Moreover, the resulting facial lines should ideally be completely symmetrical. Thus, you will get an oval face, cheeks, cheekbones and chin.
We outline the lines of the nose, forehead and hair
At the next stage of drawing in the middle of the oval of the face, we outline the nose area with two lines. We outline more clearly the chin and lines to the hair area. We make an indent in the forehead area. And then with wave-like movements we draw bangs and hair.
How to draw a portrait of a person with a pencil, using shading and an eraser, we will tell further.
Draw eyebrows and wings of the nose
The next step will be drawing the eyebrows and wings of the nose. Move the pencil to the top plane of the drawing. Step back a little from the forehead and cheekbones. Draw eyebrows resembling two identical and symmetrical, slightly raised arches. Then we move on to drawing the nose. To do this, in the middle of two strips (did them in the previous step), draw the upper and lower parts of the nose. The rest of the face is made clearer.
How to draw a portrait of a person using light and shadow, we'll talk later, when our picture is completely ready.
Draw eyes and nostrils
The next step is to draw the outlines of the eyes and nostrils. To do this, draw two lines clearly under the eyebrows and draw slightly elongated ovals of the eyes. Then draw pupils, eyelids and eyelashes inside them. Go down to the nose and point the nostrils.
Draw lips and ears
At the final stage of creating a sketch, we make a small drop-fold under the nose and draw lips. Next, draw the ears and part of the neck. The sketch is ready. It remains only to shade all parts of the face, using a harder pencil and an eraser. At the same time, in those areas where you overdo it a little with the shadow, you can make white areas with the help of an eraser.
Now you know how to draw portraits of people with a regular pencil.